1 设计模式简介
1.1 概念
设计模式是面向对象软件的设计经验,是通常设计问题的解决方案。每一种设计模式系统的命名、解释和评价了面向对象中一个重要的和重复出现的设计。
1.2 分类
| 模式分类 | 模式名称 | 模式作用 |
|---|---|---|
| 创建模式 | 工厂模式 、抽象工厂模式 、单例模式 、建造者模式 、原型模式 | 创建对象 |
| 结构模式 | 适配器模式、桥接模式、装饰模式、组合模式 、外观模式 、享元模式、代理模式 | 类和对象的组合 |
| 行为模式 | 模版方法模式、命令模式、迭代器模式、观察者模式、中介者模式、备忘录模式 解释器模式、状态模式、策略模式、责任链模式、访问者模式 |
对象之间的通信 |
2 创建模式
2.1 工厂设计模式
工厂设计模式就是,创建一个工厂类负责实例化对象,就像汽车制造厂来生成汽车一样。工厂负责创建产品,客户端访问工厂类实例化具体产品,UML图如下图所示。
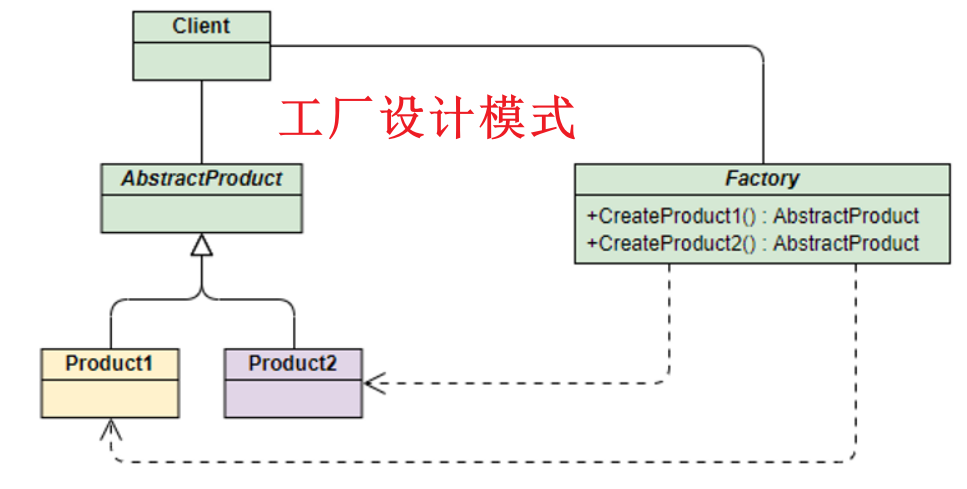
演示水果工厂如何创建水果的模式。
// 水果接口
type Fruit interface {
	grant() // 种植方法
	pick()  // 采摘方法
}

// 苹果结构体实现水果接口
type Apple struct {
	name string
}

func (*Apple) grant() {
	fmt.Println("种植苹果")
}

func (*Apple) pick() {
	fmt.Println("采摘苹果")
}

// 橘子结构体实现水果接口
type Orange struct {
	name string
}

func (*Orange) grant() {
	fmt.Println("种植橘子")
}

func (*Orange) pick() {
	fmt.Println("采摘橘子")
}

// 多态,向上类型转换
func NewFruit(t int) Fruit {
	switch t {
	case 1:
		return &Apple{}
	case 2:
		return &Orange{}

	}
	return nil
}

func main() {
	ChinaApple := NewFruit(1)
	ChinaApple.grant()
	ChinaApple.pick()

	ChinaOrange := NewFruit(2)
	ChinaOrange.grant()
	ChinaApple.pick()
}
2.2 抽象工厂设计模式
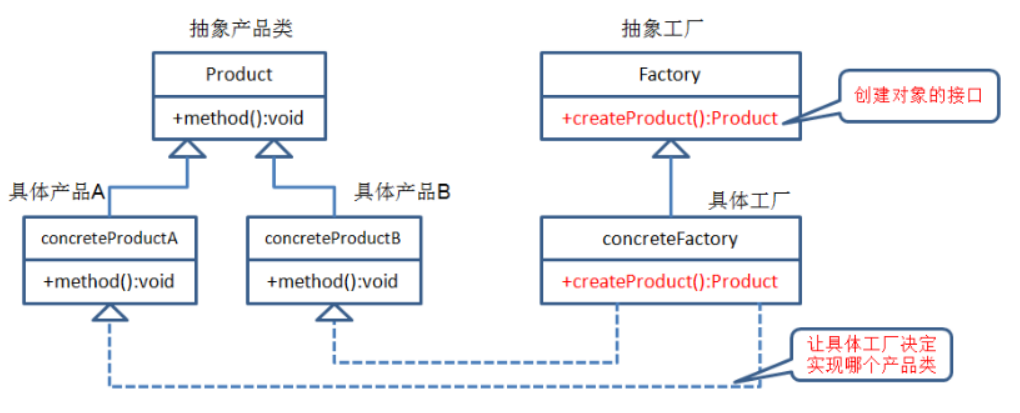
抽象工厂模式(Abstra Factory Pattern)是围绕一个超级工厂,创建其他的工厂。
2.2.1 解决的问题
在工厂模式中,一个具体的工厂对应一种具体的产品。但有时候需要工厂可以提供多个产品对象,而不是单一产品对象。
2.2.2 相关概念
产品等级结构:产品的等级结构就是产品的继承结构,如一个模型工厂,可以画出圆形,长方形和正方形的模型。抽象的模型工厂和具体的模型构成了产品等级结构。
产品族:在抽象工厂模式中,产品族指的是同一个工厂生产的,位于不同产品等级结构的一组产品。如模具厂生产的红色圆形模具,圆形模型属于模型产品等级结构,红色属于颜料产品等级结构。
2.2.3 优缺点
优点:当一个产品族中多个对象被设计成一起工作时,它可以保证客户始终只使用同一个产品族中的对象。
缺点:产品族拓展非常困难,需要修改很多代码。
// Shape 形状接口
type Shape interface {
	Draw()
}

// Color 色彩接口
type Color interface {
	Fill()
}

// Circle 实现模型接口的圆形类
type Circle struct{}

// Square 实现模型接口的正方形类
type Square struct{}

// Draw Circle类的Draw方法
func (c Circle) Draw() {
	fmt.Println("画圆形")
}

// Draw Square的Draw方法
func (s Square) Draw() {
	fmt.Println("画正方形")
}

// Red 实现色彩接口的红色类
type Red struct{}

// Green 实现色彩接口的绿色类
type Green struct{}

// Fill Red类的Fill方法
func (r Red) Fill() {
	fmt.Println("填充红色")
}

// Fill Green类的Fill方法
func (g Green) Fill() {
	fmt.Println("填充绿色")
}

// AbstractFactory 抽象工厂接口
type AbstractFactory interface {
	GetShape(shapeName string) Shape
	GetColor(colorName string) Color
}

// ShapeFactory 模型工厂的类
type ShapeFactory struct{}

// ColorFactory 色彩工厂的类
type ColorFactory struct{}

// GetShape 模型工厂实例获取模型子类的方法
func (sh ShapeFactory) GetShape(shapeName string) Shape {
	switch shapeName {
	case "circle":
		return &Circle{}
	case "square":
		return &Square{}
	default:
		return nil
	}
}

// GetColor 模型工厂实例不需要获取色彩方法
func (sh ShapeFactory) GetColor(colorName string) Color {
	return nil
}

// GetShape 色彩工厂实例不需要获取模型方法
func (cf ColorFactory) GetShape(shapeName string) Shape {
	return nil
}

// GetColor 色彩工厂实例,获取具体色彩子类
func (cf ColorFactory) GetColor(colorName string) Color {
	switch colorName {
	case "red":
		return &Red{}
	case "green":
		return &Green{}
	default:
		return nil
	}
}

// FactoryProducer 超级工厂类,用于获取工厂实例
type FactoryProducer struct{}

// GetFactory 获取工厂方法
func (fp FactoryProducer) GetFactory(factoryname string) AbstractFactory {
	switch factoryname {
	case "color":
		return &ColorFactory{}
	case "shape":
		return &ShapeFactory{}
	default:
		return nil
	}
}

// NewFactoryProducer 创建FactoryProducer类
func NewFactoryProducer() *FactoryProducer {
	return &FactoryProducer{}
}

func main() {

	superFactory := NewFactoryProducer()
	colorFactory := superFactory.GetFactory("color")
	shapeFactory := superFactory.GetFactory("shape")

	red := colorFactory.GetColor("red")
	green := colorFactory.GetColor("green")

	circle := shapeFactory.GetShape("circle")
	square := shapeFactory.GetShape("square")

	// 红色的圆形
	circle.Draw()
	red.Fill()

	// 绿色的方形
	square.Draw()
	green.Fill()
}
2.3 单例设计模式
通过单例模式可以保证系统中,应用该模式的类:一个类只有一个实例。即一个类只有一个对象实例。例如:系统里面的垃圾回收器、数据库连接池等都是单例模式。
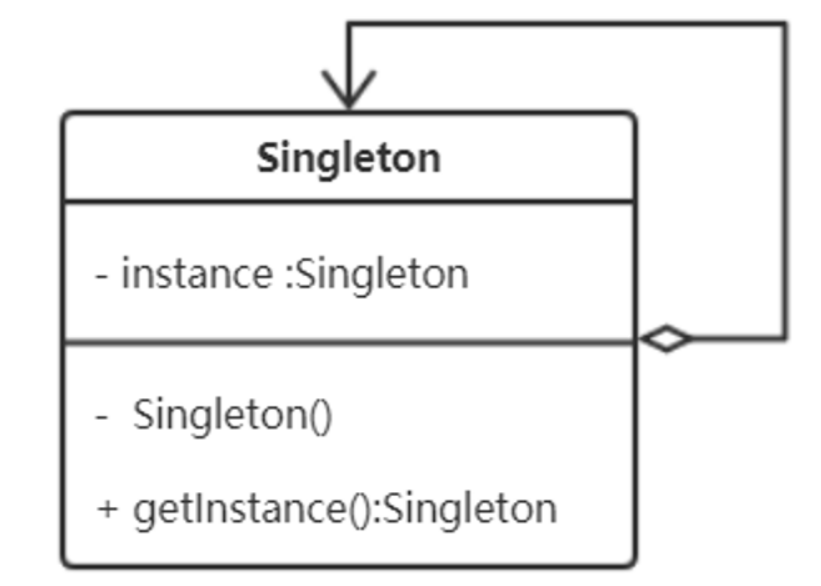
Golang里面的单例模式是通过线程同步类,sync.Once来实现的。
type Singleton interface {
	dosomething()
}

// 首字母小写 私有的 不能导出
type singleton struct{}

func (s *singleton) dosomething() {
	fmt.Println("do some thing")
}

var (
	// 保证其 Do 方法中的函数只执行一次,即使在多线程环境下
	once     sync.Once
	instance *singleton
)

func GetInstance() Singleton {
	// 接收一个函数参数,该函数只会在第一次调用时执行
	once.Do(
		func() {
			// instance 包级变量,存储唯一的单例实例
			instance = &singleton{}
		},
	)
	return instance
}

func main() {
	s1 := GetInstance()
	fmt.Printf("s1: %p\n", s1)

	s2 := GetInstance()
	fmt.Printf("s2: %p\n", s2)

}
// 运行结果:s1: 0x7ff72d4182c0  s2: 0x7ff72d4182c0
// 指针地址相同表示是同一个对象
2.4 建造者模式
建造者模式(Builder Pattern)使用多个简单的对象一步一步构建成一个复杂的对象。
一个Builder类会一步一步构造最终的对象,该Builder类是独立于其他对象的。
2.4.1 解决的问题
主要解决在软件系统中,有时候面临一个复杂对象的创建工作,通常这个复杂对象由各个部分的子对象用一定的算法构建成。由于需求的变化,这个复杂对象的各个部分通常会出现巨大的变化,所以,将各个子对象独立出来,容易修改。
2.4.2 优缺点
优点:
- 将一个系统中的变与不变分离,容易拓展
- 便于控制细节风险
缺点:
- 产品必须有共同特点,范围有限
- 如果子类变化复杂,会有很多建造类
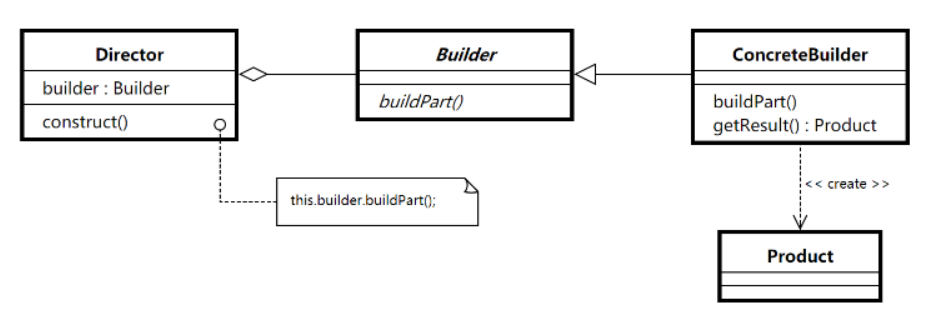
以组装电脑为例,演示如何使用构建模式。
type Builder interface {
	buildDisk()
	buildCPU()
	buildRom()
}

type SuperComputer struct {
	Name string
}

func (this *SuperComputer) buildDisk() {
	fmt.Println("超大硬盘")
}

func (this *SuperComputer) buildCPU() {
	fmt.Println("超快CPU")
}

func (this *SuperComputer) buildRom() {
	fmt.Println("超大内存")
}

// ------------

type LowComputer struct {
	Name string
}

func (this *LowComputer) buildDisk() {
	fmt.Println("超小硬盘")
}

func (this *LowComputer) buildCPU() {
	fmt.Println("超慢CPU")
}

func (this *LowComputer) buildRom() {
	fmt.Println("超小内存")
}

type Drictor struct {
	builder Builder
}

func NewConstruct(b Builder) *Drictor {
	return &Drictor{
		builder: b,
	}
}

func (this *Drictor) Consturct() {
	this.builder.buildDisk()
	this.builder.buildCPU()
	this.builder.buildRom()
}

func main() {
	sc := SuperComputer{}
	d := NewConstruct(&sc)
	d.Consturct()

	fmt.Println("--------------")

	lc := LowComputer{}
	d2 := NewConstruct(&lc)
	d2.Consturct()
}
2.5 原型模式
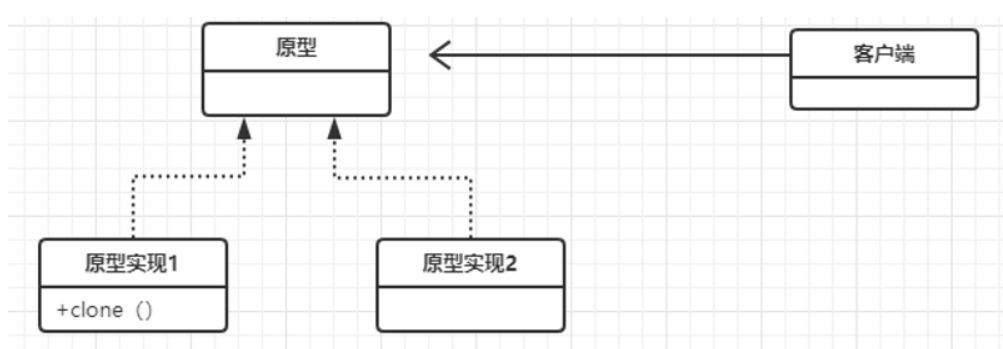
原型模式用于创建重复的对象。当一个类在创建时开销比较大时(比如大量数据准备,数据库连接),我们可以缓存该对象,当下一次调用时,返回该对象的克隆。
用原型实例指定创建对象的种类,并且通过拷贝这些原型创建新的对象。通过实现克隆clone()操作,快速的生成和原型对象一样的实例。
type CPU struct {
	Name string
}

type ROM struct {
	Name string
}

type Disk struct {
	Name string
}

type Computer struct {
	Cpu  CPU
	Rom  ROM
	Disk Disk
}

func (s *Computer) Clone() *Computer {
	resume := *s
	return &resume
}

func (s *Computer) BackUp() *Computer {
	pc := new(Computer)
	if err := deepCopy(pc, s); err != nil {
		panic(err.Error())
	}
	return pc
}

func deepCopy(dst, src interface{}) error {
	var buf bytes.Buffer
	if err := gob.NewEncoder(&buf).Encode(src); err != nil {
		return err
	}
	return gob.NewDecoder(bytes.NewBuffer(buf.Bytes())).Decode(dst)
}

func main() {
	cpu := CPU{"奔腾586"}
	rom := ROM{"金士顿"}
	disk := Disk{"三星"}

	c := Computer{
		Cpu:  cpu,
		Rom:  rom,
		Disk: disk,
	}

	c1 := c.BackUp()
	fmt.Printf("c1: %v\\n", *c1)
}
3 结构模式
3.1 适配器模式
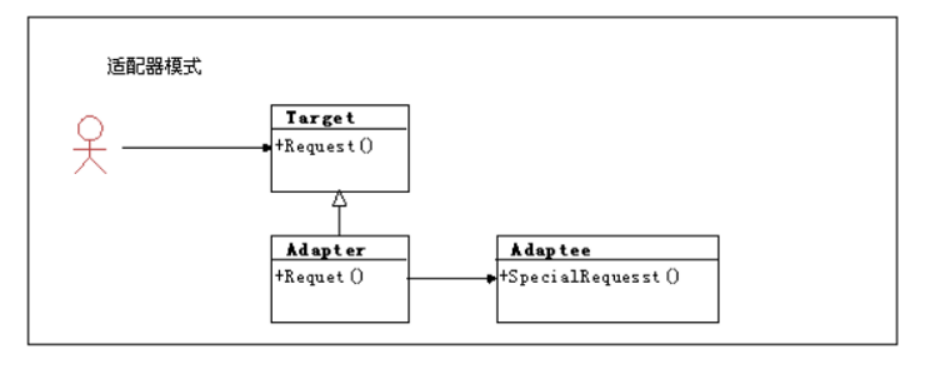
适配器模式(Adapter Pattern)是作为两个不兼容接口之间的桥梁。适配器模式将一个类的接口转换为另一个类的接口,使得原本由于接口不兼容而不能一起工作的类可以一起工作。
type OldInterface interface {
	OldMethod()
}

type OldImpl struct {
}

func (OldImpl) OldMethod() {
	fmt.Println("旧方法实现")
}

type NewInterface interface {
	NewMethod()
}

type Adapter struct {
	OldInterface
}

// 适配器
func (a *Adapter) NewMethod() {
	fmt.Println("新方法实现")
	a.OldMethod()
}

func main() {
	oldInteface := OldImpl{}
	a := Adapter{OldInterface: oldInteface}
	a.NewMethod()
}
3.2 桥接模式
桥接是用于把抽象化与实现化解偶,使得二者可以独立变化。这种类型的设计模式属于结构型模式,它通过提供抽象化和实现化之间的桥接结构,来实现二者的解偶。
这种模式涉及到一个作为桥接的接口,使得实体类的功能独立于接口实现类。这两种类型的类可被结构化改变而互不影响。

使用DrawAPI作为桥接模式的抽象接口,ShapeCirlce作为桥接模式的实体类。将抽象接口保存在实体类中,使得抽象接口实例变化时,ShapeCircle可以始终不变。
//DrawAPI 画图抽象接口,桥接模式的抽象接口
type DrawAPI interface {
	DrawCircle(radius, x, y int)
}

//RedCircle 红色圆的类,桥接模式接口
type RedCircle struct{}

//NewRedCircle 实例化红色圆
func NewRedCircle() *RedCircle {
	return &RedCircle{}
}

//DrawCircle 红色圆实现DrawAPI方法
func (rc *RedCircle) DrawCircle(radius, x, y int) {
	fmt.Printf("Drawing Circle[ color: red, radius: %d, x: %d, y: %d ]\\n", radius, x, y)
}

//GreenCircle 绿色圆的实体类,桥接模式接口
type GreenCircle struct{}

//NewGreenCircle 实例化绿色圆
func NewGreenCircle() *GreenCircle {
	return &GreenCircle{}
}

//DrawCircle 绿色圆实现DrawAPI方法
func (gc *GreenCircle) DrawCircle(radius, x, y int) {
	fmt.Printf("Drawing Circle[ color: green, radius: %d, x: %d, y: %d ]\\n", radius, x, y)
}

//ShapeCircle 桥接模式的实体类
type ShapeCircle struct {
	Radius  int
	X       int
	Y       int
	drawAPI DrawAPI
}

//NewShapeCircle 实例化桥接模式实体类
func NewShapeCircle(radius, x, y int, drawAPI DrawAPI) *ShapeCircle {
	return &ShapeCircle{
		Radius:  radius,
		X:       x,
		Y:       y,
		drawAPI: drawAPI,
	}
}

//Draw 实体类的Draw方法
func (sc *ShapeCircle) Draw() {
	sc.drawAPI.DrawCircle(sc.Radius, sc.X, sc.Y)
}

func main() {
	redCircle := NewShapeCircle(5, 6, 8, NewRedCircle())
	redCircle.Draw()

	greenCircle := NewShapeCircle(1, 2, 4, NewGreenCircle())
	greenCircle.Draw()
}
3.3 装饰器模式
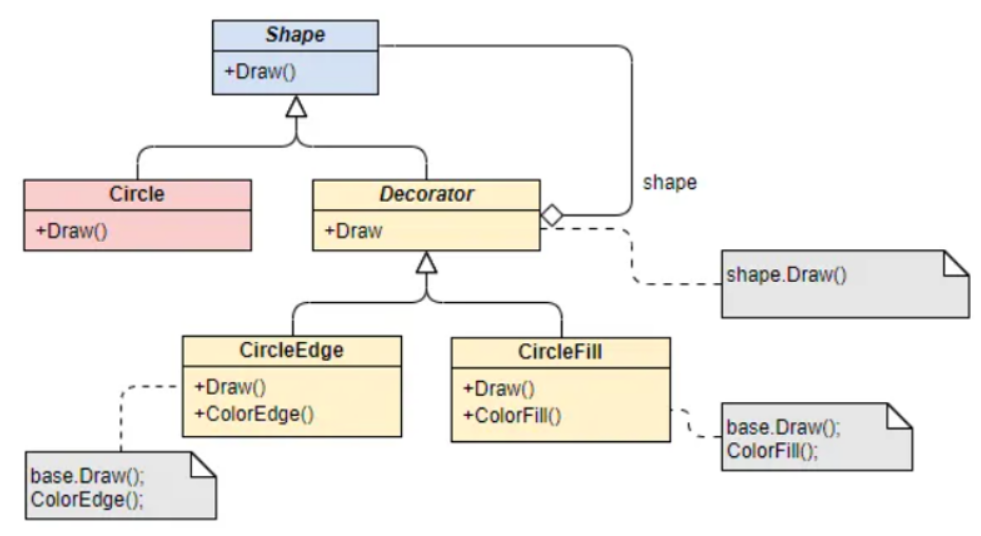
装饰器模式(Decorator Pattern)允许向一个现有的对象添加新的功能,同时又不改变其结构。
装饰器模式创建了一个装饰类,用来包装原有的类,并在保持类方法签名完整的前提下,提供了额外的功能。
//Shape 模型接口
type Shape interface {
	Draw()
}

//Circle 圆形类
type Circle struct{}

//NewCircle 实例化圆形
func NewCircle() *Circle {
	return &Circle{}
}

//Draw 输出方法,实现Shape接口
func (c *Circle) Draw() {
	fmt.Println("画圆方法")
}

//RedShapeDecorator 红色装饰器
type RedShapeDecorator struct {
	DecoratedShape Shape
}

//NewRedShapeDecorator 实例化红色装饰器
func NewRedShapeDecorator(decShape Shape) *RedShapeDecorator {
	return &RedShapeDecorator{
		DecoratedShape: decShape,
	}
}

//SetRedBorder 装饰器方法
func (rs *RedShapeDecorator) SetRedBorder() {
	fmt.Println("红色边框")
}

//Draw 实现Shape接口的方法
func (rs *RedShapeDecorator) Draw() {
	rs.DecoratedShape.Draw()
	rs.SetRedBorder()
}

func main() {
	c := NewCircle()
	rsd := NewRedShapeDecorator(c)
	rsd.Draw()
}
4 行为模式
4.1 模板方法设计模式
模板方法模式定义了一个算法的步骤,并允许子类,为一个或多个步骤提供其实践方式。让子类别在不改变算法架构的情况下,重新定义算法中的某些步骤。
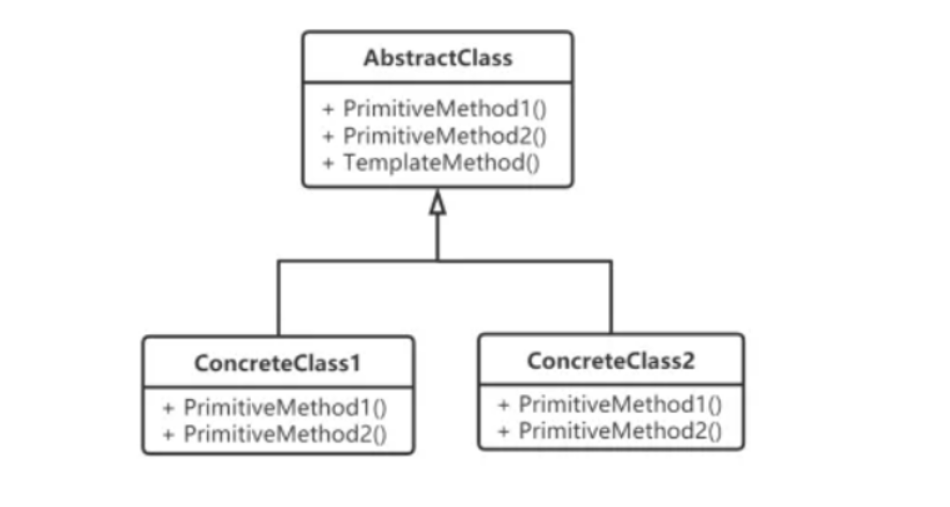
人都是一样的有出生和去世,但是中间的这个过程是不同的,成功人士生活的好,不成功的人士生活的差。
type IPerson interface {
	Birth()    // 出生
	Live()     // 生活
	Dead()     // 死亡
	LifeTime() // 一生 模板方法
}

type Person struct {
}

func (p *Person) Birth() {
	fmt.Println("出生..")
}

func (p *Person) Live() {
	// 空着等具体类实现
}

func (p *Person) Dead() {
	fmt.Println("离开..")
}

func (p *Person) LifeTime() {
	p.Birth()
	p.Live()
	p.Dead()
}

type SuccessPerson struct {
	Person
}

type FailPerson struct {
	Person
}

func (p *SuccessPerson) Live() {
	// 空着等具体类实现
	fmt.Println("成功人士活得好")
}

func (p *SuccessPerson) LifeTime() {
	p.Birth()
	p.Live()
	p.Dead()
}

func (p *FailPerson) Live() {
	// 空着等具体类实现
	fmt.Println("失败人士活得差")
}

func (p *FailPerson) LifeTime() {
	p.Birth()
	p.Live()
	p.Dead()
}

func main() {
	p := Person{}
	sp := SuccessPerson{p}
	fp := FailPerson{p}

	sp.LifeTime()

	fp.LifeTime()
}
4.2 观察者模式
定义了对象之间的一对多依赖,让多个观察者对象同时监听某一个主题对象,当主题对象发生变化时,它的所有依赖者都会收到通知并更新。这种模式有时又称作发布-订阅模式、模型-视图模式,它是对象行为型模式。
例如,微信公众号作者和粉丝之间的发布和订阅。
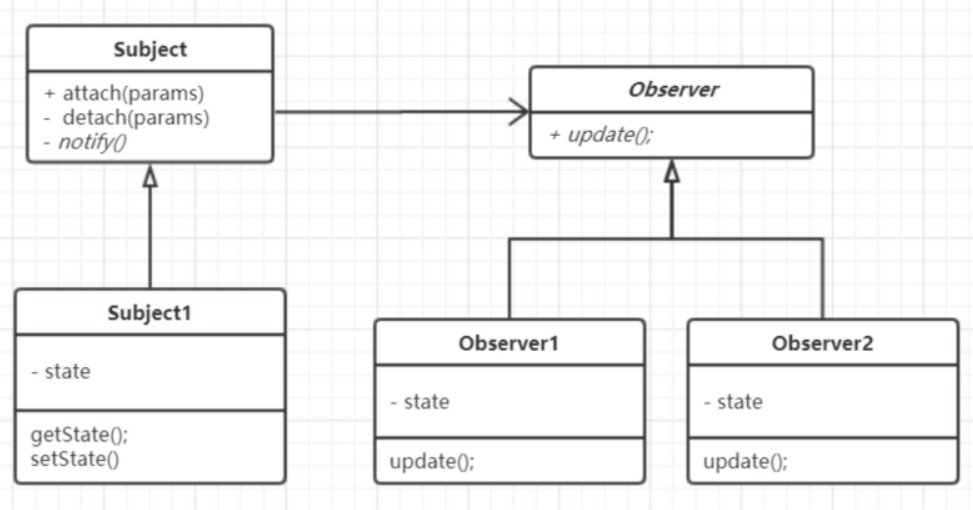
// 读者(观察者)
type Reader interface {
	// 更新方法
	Update()
}

// 读者1
type Reader1 struct {
	subject *Subject
}

func (b *Reader1) Reader1Observer(subject *Subject) {
	b.subject = subject
	b.subject.Attach(b)
}

func (b *Reader1) Update() {
	fmt.Println("读者1: ", b.subject.GetState())
}

// 读者2
type Reader2 struct {
	subject *Subject
}

func (o *Reader2) Reader2Observer(subject *Subject) {
	o.subject = subject
	o.subject.Attach(o)
}

func (o *Reader2) Update() {
	fmt.Println("读者2:", o.subject.GetState())
}

// 读者3
type Reader3 struct {
	subject *Subject
}

func (h *Reader3) Reader3Observer(subject *Subject) {
	h.subject = subject
	h.subject.Attach(h)
}

func (h *Reader3) Update() {
	fmt.Println("读者3:", h.subject.GetState())
}

// 主题
type Subject struct {
	// 观察者列表
	readers []Reader
	state   int
}

func NewSubject() *Subject {
	return &Subject{
		state:   0,
		readers: make([]Reader, 0),
	}
}

// 获得状态
func (s *Subject) GetState() int {
	return s.state
}

// 设置状态
func (s *Subject) SetState(state int) {
	s.state = state
	s.NotifyAllObservers()
}

// 添加观察者
func (s *Subject) Attach(observer Reader) {
	s.readers = append(s.readers, observer)
}

// 通知所有观察者
func (s *Subject) NotifyAllObservers() {
	for _, observer := range s.readers {
		observer.Update()
	}
}

func main() {
	subject := NewSubject()

	reader1 := Reader1{subject: subject}
	reader2 := Reader2{subject: subject}
	reader3 := Reader3{subject: subject}

	subject.Attach(&reader1)
	subject.Attach(&reader2)
	subject.Attach(&reader3)

	subject.SetState(1)
	subject.SetState(2)
}